Make More Realistic Models with Reflexivity
Reflection glossiness settings vray sketchup free trial

Master Vray and SketchUp with our free 3D rendering with Vray for SketchUp and Rhino 5 tutorial.

In this Black Spectacles free tutorial, you will learn how to set up your sun and shadow settings in V-Ray and SketchUp and how the shadows and sun orientation in V-Ray matches the SketchUp sun orientation.
This tutorial is part of the Black Spectacles course on 3D Rendering with V-Ray 3.2 for SketchUp and Rhino 5 in which you will learn how to bring a 3D model into V-Ray for SketchUp 216 and Rhino 5, render it out, and touch it up in Photoshop to give your final image a professional finesse. Let's get started:
We’re going to use a V-Ray sun and sky to start. The V-Ray sun is tied to the SketchUp shadows and sun. So go to “View” then to “Toolbars” and turn on the Shadows toolbar. Once you do that, you can see it appears in the top right-hand corner.
Zoom in and turn your shadows on by clicking the shadow icon in the shadows toolbar. When you do that, you can see you have control of where the sunlight is coming from.

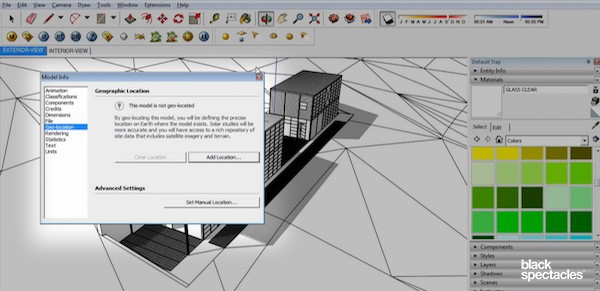
In SketchUp, there is a location tool that allows you to specify where you want your model to be.
To see that too, go to “Window,” then “Model Info,” then go to “Geo-location.” Here you can add a location to your model. Click on “Add Location” and a window pops up where you can add a specific location like Chicago, IL or wherever you want your model to be
That is essentially how you will located the north orientation and correctly position your model in space. That information is what theV-Ray sun will use to also orientate yourself.
So if you turn your shadows on, and your settings are set so that it’s the Fall – between September and October – and the time of day is set as afternoon. Then you hit “Render,” the shadows will match that, using the V-Ray sun.
But first you need to make sure the V-Ray sun is enabled. To do that, first turn the shadows off.
Then go to the V-Ray Render Option Editor, and click on “Environment” to expand that section. Make sure the “GI (skylight)” is turned on by checking that box. And then you see there’s a big “M” and a small “m.” The small “m” indicates that there’s no texture or no other tools assigned to it. Checking the big “M” means there’s something assigned to it.
Click on the big “M” and a new window will pop up. Select “TexSky” from dropdown menu which is basically a skylight system that’s enabled in V-Ray. Then it will give you the options for a sun. In the Default Sky Options at the top, select “Sun 1” from the dropdown – this is the SketchUp sun. Then go to the Sun section and make sure you check the box for “Enabled” to ensure it’s on. For the most part, all of the other default settings are great. Leave the intensity at 1 because it’s calibrated for our physical sunlight system.
The one thing to keep in mind is the size under the Sun settings. Right now it’s set at 1 – when you render that out, it will be really small, almost pixel size. And that’s where all the light is coming from. So what happens is, if the size is 1, you’ll get really crisp and hard shadows on the ground. If you increase the size to 3 or 5, the actual surface where that sunlight is coming from gets larger, the edges get a little blurrier, and it’s a bit more natural. But just keep that in mind depending what effect you want, you can control that through the size of the sun in these settings. Leave it at 1 for now.
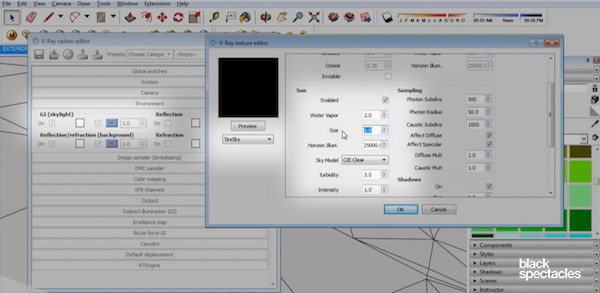
Click "Ok," and then click on the big “M” under “Reflection/refraction (background).” You just want to match what you put in on the GI (skylight).
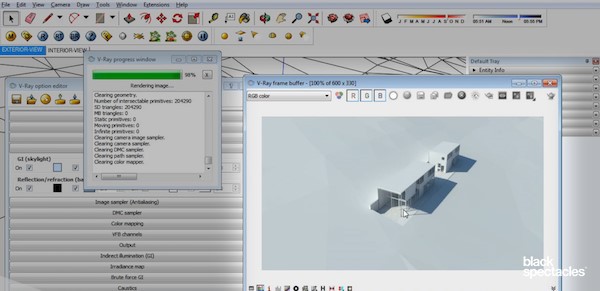
Now, when you render, you can see the shadows orientation, the sun orientation matches the SketchUp sun orientation.
If you want to change it, just control it here through SketchUp and the V-Ray sun will match that.
Reflection glossiness settings vray sketchup free trial
Learn about the image sampler and antialiasing settings in Vray 3.2 Sketchup 2016 and Rhino 5 in this free tutorial.
Learn about applying the Vray Toon Effect in Vray 3.2 for 3ds Max in this free Black Spectacles tutorial.