Take Your Renderings to the Next Level in Photoshop
Rendered channels into photoshop free tutorial

Reflection glossiness settings vray sketchup free trial

A free tutorial from the Black Spectacles course 3D Rendering with Vray 3.2 for SketchUp and Rhino 5.
In this Black Spectacles free tutorial, you will learn how to utilize the reflection and highlight settings within Vray 3.2 for SketchUp to make more realistic-looking models.
This tutorial is part of the Black Spectacles course on 3D Rendering with Vray 3.2 for SketchUp and Rhino 5 in which you will learn how to bring a 3D model into Vray for SketchUp 216 and Rhino 5, render it out, and touch it up in Photoshop to give your final image a professional finesse.
Reflection Glossiness Settings Tutorial
You can see here that the current model has some reflexivity on it. You can see the texture behind it, and some reflections on top of that. But the reflections are really crisp which makes it look like it’s a very glossy surface instead of a rough surface with reflexivity.

That’s where the Reflections and Highlight settings come into play.
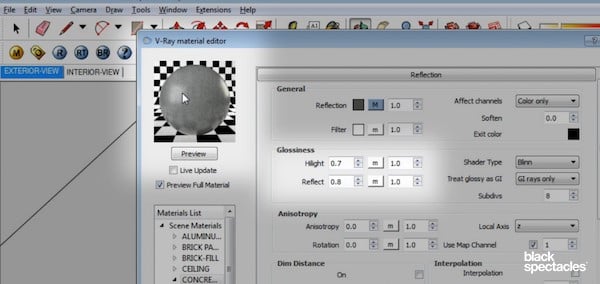
Step 1: Set the Reflections
Under “Glossiness” is where you will specify the crispness and clarity of these reflections. The first one being the “Reflect” option. It’s set at 1 which now which specifies that the reflections are going to be super clear. If you take that number down, the reflections are going to start getting blurry. Set it at 0.8 for now, and click the “Preview” button to see the difference. You can already see those reflections are still there, just blurry.

To give you some perspective, for woods, you typically will use 0.8 or 0.9. For aluminum, it will be around 0.5.
Step 2: Set the Highlights
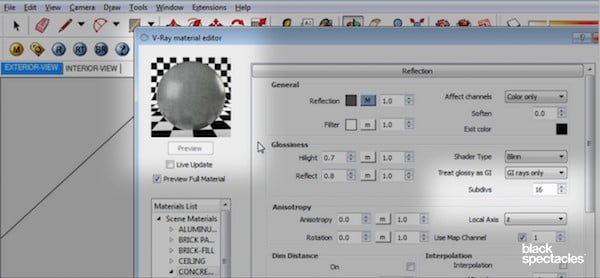
The other setting to note when dealing with reflectiveness is the Highlights. So look at the “Hlight” setting in the material editor. If you change that number from 1 to 0.7 and click Preview, the areas that are brightest, you can see are getting blurrier. It’s another quick setting to start tweaking those materials to make them as realistic as possible.
Step 3: Increase the Subdivisions
One more thing to note is when you start taking the reflexivity and crispness down into these blurry areas, what will happen is the reflections become really grainy. So you are going to have to increase the number of subdivisions within that texture. Go to the “Subdivs” setting and increase it from 8 to 16 or 24 just to get a little less grainy of a result. Upping the subdivisions is a good practice to get a better quality.
So by utilizing these Reflection settings within the V-Ray material editor, you can make much more realistic-looking models.
Watch the video for this tutorial here:
Rendered channels into photoshop free tutorial
Master Vray and SketchUp with our free 3D rendering with Vray for SketchUp and Rhino 5 tutorial.
Learn how to build a room tag with separate labels in Revit 2016 in this free Black Spectacles tutorial.