Make Your Renderings Camera Ready
Learn about setting the Camera and Environment Options in Rhino 5 for Vray 3.2 in this free tutorial.

Learn about the image sampler and antialiasing settings in Vray 3.2 Sketchup 2016 and Rhino 5 in this free tutorial.
A free tutorial from the Black Spectacles course 3D Rendering with Vray 3.2 for SketchUp and Rhino 5.
In this Black Spectacles FREE tutorial, you will learn about the concept of Antialiasing, how to adjust the settings, and how to utilize it in your renderings.
This tutorial is part of the Black Spectacles course on 3D Rendering with Vray 3.2 for SketchUp and Rhino 5 in which you will learn how to bring a 3D model into Vray for SketchUp 216 and Rhino 5, render it out, and touch it up in Photoshop to give your final image a professional finesse. View the entire course here.
The concept of antialiasing has to do with the method of blurring the pixels. Specifically, the pixel edges.
We’re all on LCD screens that have square pixels. And if you draw a diagonal line across square pixels, you’re going to get a stair step effect on both sides of the line. Antialiasing is the different algorithms that have been developed, in different filters, to blur those lines so you don’t see those jagged edges when you draw a diagonal line.
This happens at render time. And more often than not, it’s blurring lines, but it’s also blurring color or light. It’s defining the edges of 2 things coming together visually on the screen.
There are some 3D artists that don’t do antialiasing at all. When you render at high resolution, the antialiasing is almost non-perceivable, which is why they sometimes turn it off. It’s like looking at your phone screen – there are still square pixels, but your eye can’t perceive it.
Unless you are rendering something really big, you can leave the antialiasing. It does take a little bit of extra render time, however, so if you’re trying to minimize the render time as much as possible, just switch it off.
In the V-Ray option editor, click on “Image sample (Antialiasing)” and you will see an “Antialiasing filter” section. Simply uncheck the box in that section to turn it off.
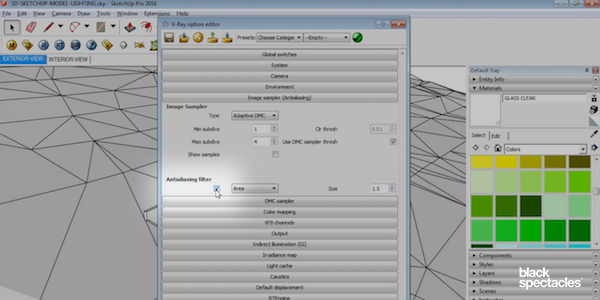
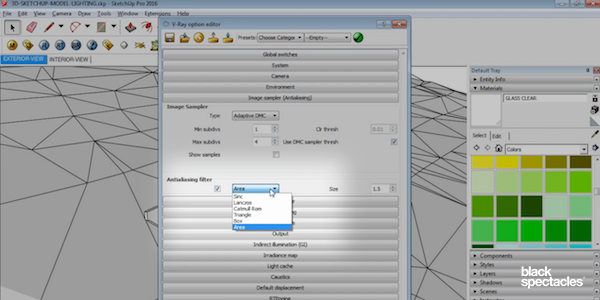
In that section, you will also see the different types of antialiasing filters. “Area” is the most common one. Here you also select your size. Right now it’s 1.5pixels which means it’s going to blur a pixel and a half around each edge that it considers to need that effect.
Box is another type that is very similar to the Gaussian blur setting in Photoshop.
Then there’s Catmull Rom, which was written by Ed Catmull, one of the CEOs of Pixar. There’s a lot of old rendering engines used from guys like him that started computer animation. This one has a nice blend of Gaussian blur and some sharpness to it.
There’s no right or wrong answer when it comes to choosing an antialiasing filter. Experiment with them, have some fun, find the one you like and go with it.
Watch the video for this tutorial here:
Learn about setting the Camera and Environment Options in Rhino 5 for Vray 3.2 in this free tutorial.
Learn about creating a daylight system in Vray 3.2 for 3ds Max in this free tutorial.
Learn how to use VRay Proxy to import geometry from an external mesh through this teapot example in Vray 3.2 for 3ds Max in this free tutorial.