The Easiest Way to Turn a Surface Into a Solid in Dynamo
Learn about creating a surface by patch, and turning that surface into a solid in Dynamo in this free Black Spectacles tutorial.

Learn the 3 best techniques for creating solids in Dynamo from our resident architect, Chris Hopstock.

A free tutorial from the Black Spectacles course The Basics of Computational Design in Dynamo.
In this Black Spectacles free tutorial, you will learn the 3 best techniques for creating solids in Dynamo. This tutorial is part of the Black Spectacles course on computational design in Dynamo in which you will learn the basics of how to navigate Dynamo and harness the power of computational design to create complex forms quickly and precisely.
In this tutorial, you’re going to create solids a few different ways. There are three ways to create a solid. The first is to simply create a surface and thicken it.
The second way is to generate a solid by loft.
Create a Solid by Loft:
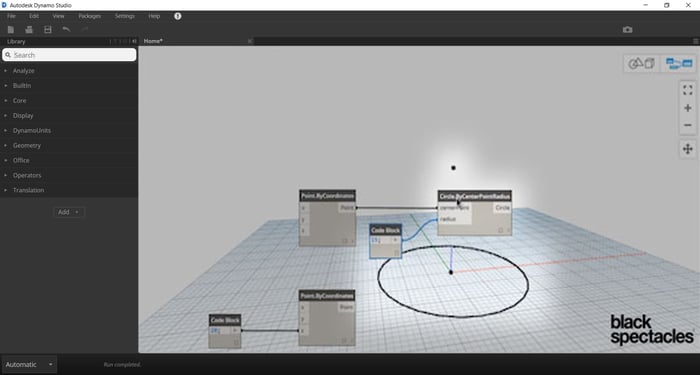
Step 1: Create a circle
To begin, go to “New” and start with a brand new definition.
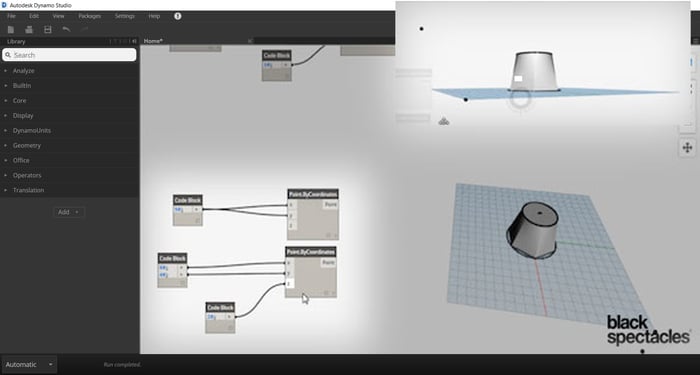
As with most things in Dynamo, you need to start with points. Choose the node “Point.ByCoordinates.” For one of these points we need a Z of 20, so create a code block of 20, and the X and Y are zero, so you can just leave them as is. Then create another Point.ByCoordinates which is just at zero. So you don’t need to enter any numbers. Now you have a point at 0 and a point at 20.
Next you’re going to create a circle at the bottom point. Select the node “Circle.ByCenterPointRadius.” Plug the centerpoint into the zero point, and for the radius, make a code block of 15, and plug that in. Now you have a large circle.
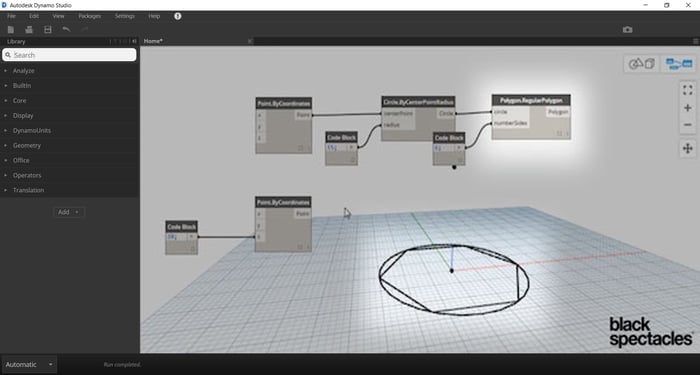
Step 2: Create a polygon
Now you are going to create a polygon from that circle. Select “Polygon.RegularPolygon” and create a code block of 6 for the number of sides, and plug the circle input into the circle you created in the previous step.
Now you have a hexagon. This is going to be one side of the solid you are going to create.
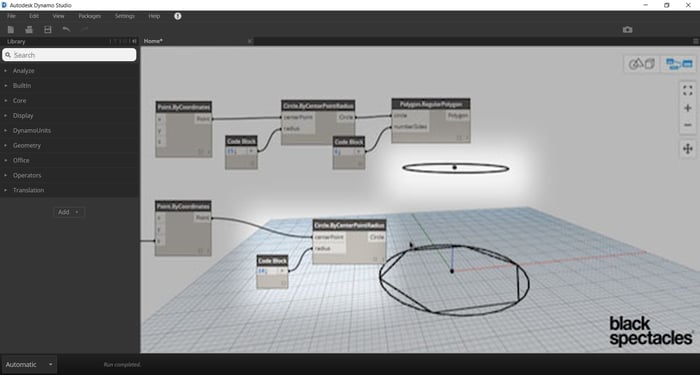
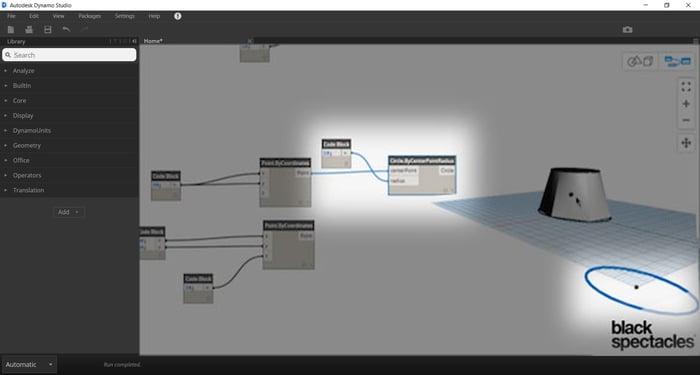
Step 3: Create a second circle
The other part of the solid is going to come from your 20 point. First you need to create a simple circle. The easiest way is just to copy and paste your last circle nodes, and then change your radius on the new circle to 10, and have the centerpoint connect to your point that’s at 20.
Now you’ve got a circle at the top, and a polygon at the bottom.
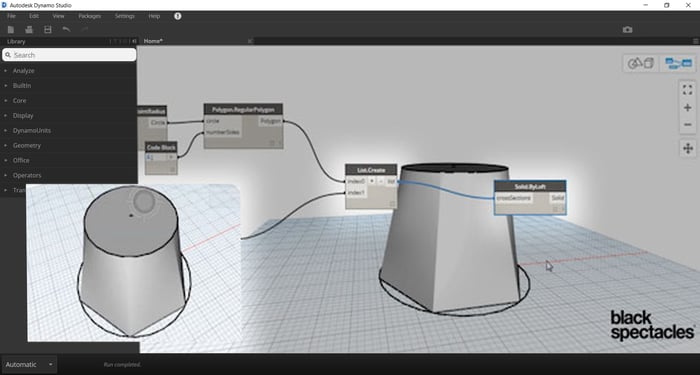
Step 4: Loft the two items
Next you need to just blend the two together using a loft. You’re going to create a list of those two items using “List.Create.” You just have two items, so plug the polygon into one, and the circle into the other.
Select the “Sold.ByLoft” node and plug your list into it. You can see you now have a solid form. If you hit escape and spin it around, you can see it’s not a surface, but a solid piece of geometry.
You've now mastered creating a solid by loft, by thickening a surface and the third way you can do it, is to create a curve, and extrude that curve as a solid.
Create a Solid By Curve Extrude:
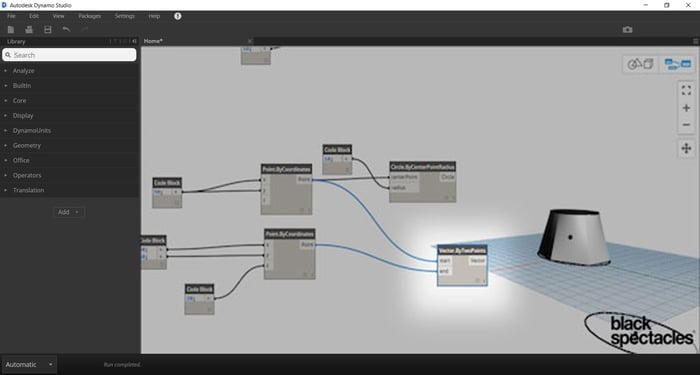
Step 1: Create two points
First you need to establish a curve. You need two Point.ByCoordinates to start. For the first one, place the X and Y points at 50. The second point, using code blocks again, needs an X of 60, a Y of 40, and a Z of 20. So now you have two points in different places.
Next you are going to take those two points and create a circle on one of them. Then you’ll use the other point as a vector, and create a solid between the two.
Step 2: Create a circle
For the 50 point, you are going to create a circle. Select Circle.ByCenterPointRadius and plug the centerpoint into the 50 point, and a code block of 10 for the radius. Now you can see a circle in the corner of the screen.
Step 3: Create a vector
If you drew a line between these two points, it could represent a line, or it could represent a vector. In this particular case, you want to represent it as a vector. To do that, use “Vector.ByTwoPoints.”
The start of the vector is going to be the 50 point, which is the center of your circle. And the end of the vector is going to be your other point. When you plug those in, you can see nothing changes, this is because a vector is a direction, it’s not visual.
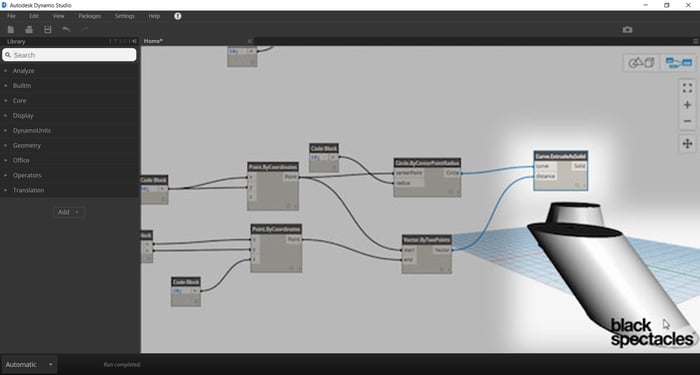
Step 4: Extrude the curve as a solid
But now that you have a shape and a vector, you can use that vector as a curve. The node for that is called “Curve.ExtrudeAsSolid.” In this case, the curve is actually the circle, and the distance is the vector.
Now you can see it extrudes that circle along that vector, or between the two points.
When a colleague of yours asks you the the various ways (along with thickening a surface to create a solid) to generate a solid within Dynamo, you'll be able to confidently give them a tutorial!
Learn about creating a surface by patch, and turning that surface into a solid in Dynamo in this free Black Spectacles tutorial.
Black Spectacles Partners with NOMA to Help Increase Equity in the Architecture Field
Learn how to create polycurves and put points on them in Dynamo in this free Black Spectacles tutorial.