What Can a Teapot Teach You About Rendering?
Learn how to use VRay Proxy to import geometry from an external mesh through this teapot example in Vray 3.2 for 3ds Max in this free tutorial.

Learn about setting the Camera and Environment Options in Rhino 5 for Vray 3.2 in this free tutorial.

A free tutorial from the Black Spectacles course 3D Rendering with Vray 3.2 for SketchUp and Rhino 5.
In this Black Spectacles FREE tutorial, you will learn how to set your camera and environment settings in Rhino 5.
This tutorial is part of the Black Spectacles course on 3D Rendering with Vray 3.2 for SketchUp and Rhino 5 in which you will learn how to bring a 3D model into Vray for SketchUp 216 and Rhino 5, render it out, and touch it up in Photoshop to give your final image a professional finesse.
View the entire course here:
3D Rendering with Vray 3.2 for SketchUp and Rhino 5
Setting Your Camera and Environment Options in Rhino 5 Tutorial
Step 1: Set Your Physical Camera Settings
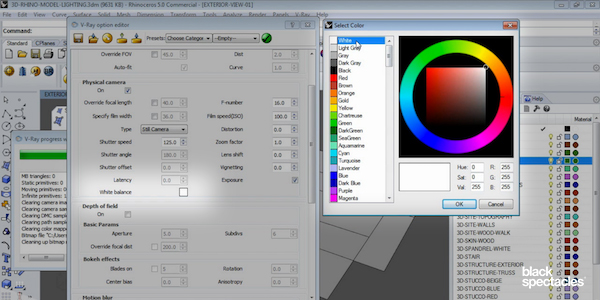
In the V-Ray option editor, you can see the camera settings. Go to the Physical Camera section. For this example, choose “Still Camera” as the type, set the Shutter Speed at 125.0, with a F-number of 16, and Film speed of 100.
Make sure the Exposure is turned on by checking the box next to it. If you don’t turn the exposure on, all of these values will be completely irrelevant. So if you are following the physical camera, physical lights, and physical rules, make sure the exposure is on.
Leave the Depth of Field off for now and the Motion Blur settings as is.

Step 2: Set the White Balance
The White Balance is important too. It’s always good to leave it pure white. If you choose another color, it will make that color a white color. So if you were to have a blue-tinted rendering, and you want everything to be white, you could go into the white balance, select that same blue hue, and all that blue will turn into white. However, that means all the other colors are shifting too. It’s not just the blue to white, everything else is shifting. So the reds could turn out to be a different kind of red. So to keep things neutral, and to leave all the color correction for post-processing in Photoshop, it’s best to leave the white balance as pure white.
But if you’re in a bind and tight on time and you just have to get a rendering out, and it’s got some weird tint, you can always go into the white balance and put in the color that your render is tinted in to correct it. But it’s good to just understand how that works.
Step 3: Turn on the Vray Sunlight and Skylight
Next go into the Environment Settings. You want to use the Vray sunlight and skylight systems for this example so make sure you check the boxes next to “GI (skylight)” and “Reflection/refraction (background)” to turn those on. These are specific Vray sunlight settings that you create, so this will be a separate light that you include in this scenario.

Watch the video for this tutorial here:
Learn how to use VRay Proxy to import geometry from an external mesh through this teapot example in Vray 3.2 for 3ds Max in this free tutorial.
Learn about creating a daylight system in Vray 3.2 for 3ds Max in this free tutorial.
Learn about applying the Vray Toon Effect in Vray 3.2 for 3ds Max in this free Black Spectacles tutorial.