Black Spectacles and NOMA Partner to Increase Equity in Architecture
Black Spectacles Partners with NOMA to Help Increase Equity in the Architecture Field

Learn how to create polycurves and put points on them in Dynamo in this free Black Spectacles tutorial.

A free tutorial from the Black Spectacles course The Basics of Computational Design in Dynamo.
In this Black Spectacles FREE tutorial, you will learn how to create polycurves and place points on those curves. This tutorial is part of the Black Spectacles course on computational design in Dynamo in which you will learn basics of how to navigate Dynamo and harness the power of computational design to create complex forms quickly and precisely.
View the entire course here:
The Basics of Computational Design in Dynamo
Step 1: Create a polycurve
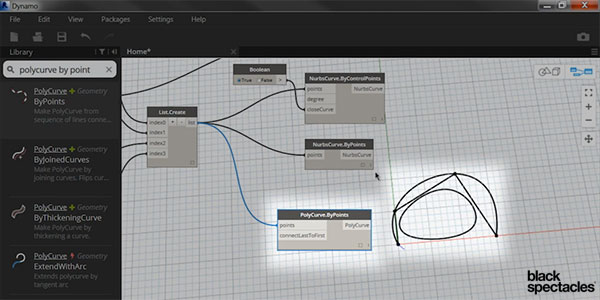
There’s something in Dynamo called a Polycurve. Which is a line that is made up of multiple segments.
To create a polycurve, you need to select the node labeled “PolyCurve.ByPoints.” Next, you can plug that that polycurve into your “List.Create.”
You can see that by creating a polycurve, it’s creating 3 line segments. However, Dynamo reads those 3 line segments as one continuous line. Whereas the “Line.ByStartPointEndPoint” node is just one single line segment.
So these are just examples of how you can create different types of lines.
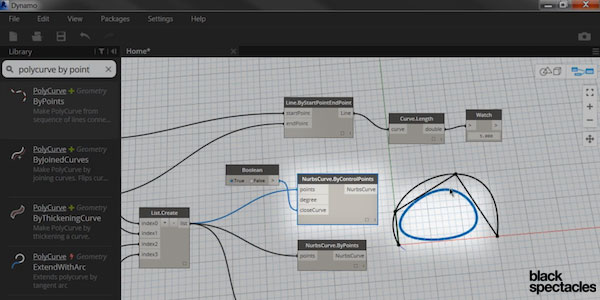
Dynamo Tip: One thing to notice in Dynamo, is that when you click on a node, whatever that node is producing will be highlighted in the geometry space. This makes it very easy to know which node is producing each piece of geometry.
Step 2: Place a point on the curve
But let’s take this one step further. What if you wanted to put points on some of these lines?
Then there is a node called “Curve.PointAtParameter.” The input for this is a curve and a parameter. So let’s do this for the Node “ NurbsCurve.ByPoints.”
Plug the NurbesCurve.ByPoints into the curve Curve.PointAtParameter. You will notice that nothing happens because you haven’t defined what the parameter is. The only parameter is has is a default value of zero. So you can see it placed a point at zero.
Step 3: Place a series of points on the curve
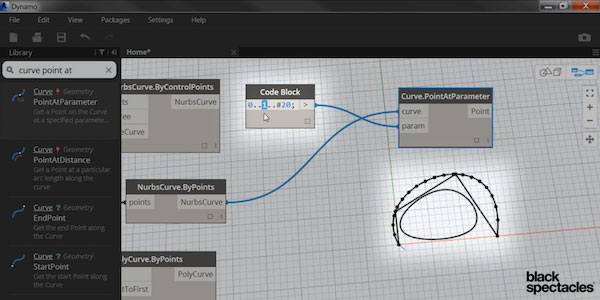
If you want to place points all along the curve, you need a series of points. To do that you first need to create a code block with a series. Type in “0..1..#20.”
This may seem strange, because it looks as though you’re saying, start at 0, end at 1, and have 20 dots between them. But actually when you’re talking about lines and surfaces in Dyanmo, when you say 0 to 1, what you’re saying is to start at the beginning and go all the way to the end. So it’s saying to go from 0 to 1, which is beginning to end, and put 20 points along the the entire curve.
Plug that into your param input and you can see you have 20 points now, going across that entire curve.
If you were to change that 1 to 0.5, you can see it only puts those 20 points on half of that curve. So what you’re doing here is defining a percentage of the line. If you want it to go 100%, you put a 1, if you only want it to go 25% of the way, you put a 0.25, and then it crunches all 20 dots within just 25% of the total line.
Step 4: Place points along the polycurve
You can do the same thing on a polycurve. Even though these are 3 separate straight lines, Dynamo is interpreting them as one single element. So if you plug the Polycurve from the PolyCurve.ByPoints into your Curve.PointAtParameter curve input, and it puts the lines on that polycurve.
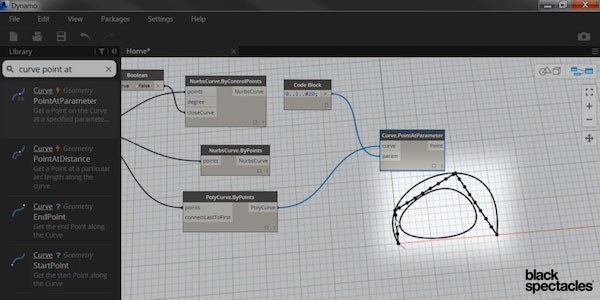
This is how to create curves in Dynamo and place a series of points on those curves.
Black Spectacles Partners with NOMA to Help Increase Equity in the Architecture Field
Learn about creating a surface by patch, and turning that surface into a solid in Dynamo in this free Black Spectacles tutorial.
Learn about number and integer sliders in Dynamo in this Black Spectacles free tutorial.